Pozi Connect Installation

Pre-Installation tasks

Server provisioning (by site IT rep)

- We recommend provisioning a new virtual server with Windows Server 2019.

- Pozi Connect installs as a Windows Service and has no dependencies. (No IIS required)

- The installed Windows service binds to port 443 (HTTPS).

- The server must have access to *.pozi.com

Windows Service Account (by site IT rep)

** Skip this section if only require to run the windows service as a local account - this would likely require clarification by the site IT administrator, but it would be more usual to run the Windows Service as a domain user account (not a local user account), so this section should NOT be skipped **

The Pozi Connect Windows Service runs by default as a local system account. If Pozi needs access to network resources and/or databases (eg. VRT files which reference network resources), the Pozi Connect Windows service may need to be configured to run as a domain user.  That domain user should be provisioned as follows:

- permanent access 
-  no password change required.
- access to network folders/files that are required 
- trusted user of any databases that are required
More details below about adding this user to the Pozi Connect Server windows service.

Local DNS configuration (by site IT)

** Skip this section if you do not have a local DNS server **

- For sites with a local DNS server, a DNS entry should be created.

- Add "local.pozi.com" as a "forward lookup zone (primary)" then create an "A record with no hostname" (matches zone) to the internal server, also see screenshot. For more detailed instructions search Google for "add dns entry for domains outside your local domain".

To confirm the DNS configured correctly, open a command prompt window and ping local.pozi.com. It should return a reply from the same server IP on which Pozi Connect Server is/will be installed.

Local HOSTS file setup (by site IT)

** Skip this section if you setup a local DNS **

- If there is no local DNS server then hosts records must be created on each client PC. 

- NOTE: The install process automatically adds a hosts file entry to the local PC.

- Edit c:\windows\system32\drivers\etc\hosts as administratorand add [SERVERIP] local.pozi.com

Shared application server checks (Pozi people)

** This section can be skipped if this is new virtual server. **

- While we have instances of Pozi Connect running on shared servers we do not recommend it, however if that is the only option, then perform these checks.

- Check the shared server has nothing running on https (port 443). Sometimes the default install of IIS has had a binding added for port 443. You can check this by launching https://localhost/ To remove the default IIS binding you can load the IIS config manager and remove the HTTPS binding from the default website and restart IIS.

- If and only if HTTPS is in use by another application on the same server can set a system environment variable POZI_CONNECT_PORT to point to a different port number. E.g. 3001. (If you already installed PoziConnectServer, then restart the service and access the webserver as appropriate, e.g. https://local.pozi.com:3002/)

Control Panel > System and Security > System > Advanced system settings > Environment Variables > System variables

- Check if Pozi Connect M1 is already installed (usually in C:\PoziConnect) (Also there is likely an Icon on the desktop). If there is an icon on the desktop, temporarily rename it to something else, eg PoziConnect_OLD, so that it doesn't get overridden by PoziServer installation process. This will need further migration steps by SOK (see M1 migration section below).

- On the server we recommend installing Google Chrome with the provided user credentials. This serves two purposes: 1) Confirms the user you are logged in as has permissions to install stuff on the server and 2) Will make the rest of this install guide much easier than using IE.

Installation

Remote access

If you wish to have Pozi support perform the install on your behalf, please provide a user account with administrator privileges to the server and remote access details. E.g. Citrix/VPN/etc details. (The user account should not be the same as the Windows Service account.)

- Run installer (as admin), fill in prompts:
- company to identify site name, 
- email address can be username@pozi.com
- Tick M1 if they have the old PoziConnect (note that the old Pozi Connect may have been installed on another server, but in any case look for the Pozi Connect icon on the desktop, and if it exists, change its name to Pozi Connect Old if it hasn't already been changed).
- Installer typically takes around 1-2 minutes depending on internet connection speeds, will be a bit longer if M1 also installed. During the install you can click the details button to watch install progress. The most common issue you might encounter is that the installer cannot get files from https://connect.pozi.com/ this indicates a possible firewall issue and typically requires site IT to resolve. Also, please ignore the message SERVICE_START_PENDING, this just indicates that the service was still starting when the installer performed the check.
- If the M1 process was installed then a new PoziConnect icon will appear on the desktop.  If there was an old PoziConnect icon (which you renamed earlier), then rename the new icon to PoziConnect_NEW, and then rename the old back to Pozi Connect.
- Close the installer
Testing
- Open Windows Services to confirm that there are now two PoziConnect services.

- For sites with a local DNS (ping local.pozi.com, if the return is from cloudfront that means no DNS configured), consider removing the hosts file entry for local.pozi.com in order to test that the local DNS is working.

- Open https://local.pozi.com/ in browser, should load the Pozi Connect home page.
- - Open Windows Services to confirm that there are now two PoziConnect services.
- Copy the folder and contents from c:\Program Files (x86)\Pozi\server\data\sample to  c:\Program Files (x86)\Pozi\userdata\local\sample (will need to create \local\sample) 
- Return to  https://local.pozi.com/ and click on the tests tab... and run the tests, most tests return JSON.

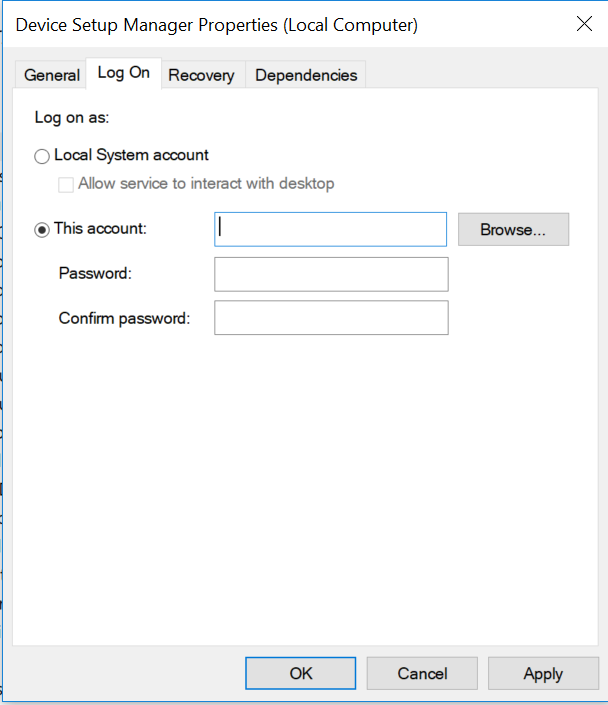
Windows service account configuration

** Skip this section if the Windows service does not require access to network resources - this would likely require clarification by the site IT administrator, but more commonly there would need to be access to network services and so this section should NOT be skipped. **
- Locate the Windows service user details that were provided by the client in the (see Windows Service Account section above).
- Start > Run > services.msc
- PoziConnectServer > Properties > Log On   this present you with the following dialog:

- select "Log on as: This account"

- At this point you may see the Account and Password fields already populated, and while these credentials may provide sufficient permissions for the PoziConnectServer service to function fully, you should attempt to change the Windows Service user details to those as provided by the client (presuming you have them)
- To do this, click Browse > set Locations to Entire Directory, enter first letters of username > Check Names > OK (Sometimes requires entering domain/ before username)
- enter password twice > OK  (if a popup appears confirming rights have been granted, click okay)
- Restart service (right click restart)
Note: do *NOT* do this step for the PoziConnectUpdater; it needs to run as Local System. 

Pozi Connect Server Directory Permissions

Pozi Connect Server has been installed in a directory within \Program Files (x86), and by default the permissions will be set as read-only. This needs to be changed to full access.
To change the permissions, navigate to  \Program Files (x86) and right-click on the \Pozi directory, and open the properties dialog, and then the security tab. Click the edit  button and add a new user via the Add button. The user will be searchable, and will be something like "groundtruth". Give the user Full Control.  After this change the \Pozi directory structure will have write permissions, which will allow creation/editing of VRT files (in  c:\Program Files (x86)\Pozi\userdata\local) among other things.

Migration

** Skip this section if this was a fresh install **

- Existing PoziServer installs need the VRT files copied to the new install location. Copy C:\PoziServer\application\data\vrt folder to C:\Program Files (x86)\Pozi\userdata\local\vrt

- Update Pozi Web Map config manager dataset endpoints with the new URL. E.g. Update this type of endpoint http://192.168.0.234:3000/ogr2ogr...  to https://local.pozi.com/ogr2ogr...

Public Data Publishing Module

Pozi staff refer to https://trello.com/c/GmoNIF78/160-poziconnect-data-sync-customer-onboard-process

Contact us for a quote and to provision credentials to publish your datasets to the Pozi Public Cloud

- Load https://local.pozi.com/settingssync in a browser.

- Enter credentials provided by Pozi support.

- Restart PoziConnectServer windows service.

- Test this by copying a file to C:\Program Files (x86)\Pozi\userdata\public to make it available at https://connect.pozi.com/userdata/[SITENAME]/public/*

- Pozi Web map can be used to display these endpoints to your customers. Ask us how!

Testing Data Connections

The GDAL library included in Pozi Server is the "engine" for data connections. To test these data connections and create the necessary VRT files, it is useful to run ogr2ogr commands using the GDAL SDK Shell, available at "C:\Program Files (x86)\Pozi\server\vendor\gdal\SDKShell.bat". Place a shortcut to this file on the desktop for convenience.
If you need to test the ogr2ogr commands running under a different user account (see Domain Users above), enter the following into the shell to pop open another command window that will run as the specified user:

runas /user:(full user account name, including domain) cmd

M1 Migration

M1 and Audit files

The various M1s and audit files that Pozi Connect generates are typically here:
- PoziConnect\output\M1\
- PoziConnect\output\Audits\

Data file

The data file (eg Cardinia.sqlite, GlenEira.sqlite) exist in one of three locations:
- PoziConnect\output\
- PoziConnect\output\DB\
- C:\Temp\ (this is used when there is a performance issue with read/write speeds on the client network)
Also copy the data file to new Pozi Connect location because this file contains the history of the match rate, from which the dashboard can generate a graph of the council's property match progress.

Troubleshooting

Application testing is performed against Windows Server 2019 but we have working sites from Windows Server 2008. 

Note that the packaged GDAL library does not support 64 ODBC DSN connections.

Note that SERVICE_START_PENDING is just a warning... this does not indicate a failed install.
Open https://local.pozi.com/ on the server, it should load a webpage.
Open https://local.pozi.com/ on the server and test the sample data links (see Testing Data Connections for more detailed testing.)
Check the Windows service PoziConnectServer is running.
On a domain, check the service PoziConnectServer has correct permissions as running user.
Check the hosts file on the server contains 127.0.0.1 local.pozi.com
Check the domain is configured to point local.pozi.com to the server.
Check the domain has the port 443 open to the server.
Check the server logs C:\Program Files (x86)\Pozi\server\log.txt